
Why a Leaking Corrugated Metal Roof Demands Immediate Action
To fix leaks corrugated metal roof systems, the most effective solutions are replacing failed fasteners with oversized rubber-washer screws, sealing panel laps with butyl tape, and repairing penetrations with metal-compatible polyurethane sealant. For homeowners across the region, Total Foundation & Roofing Repair provides the expertise needed to safeguard your property against the elements. Homeowners who need proven roofing and exterior repair specialists should act at the first sign of moisture, because leak damage spreads fast and can compromise the structural integrity of the entire building envelope.
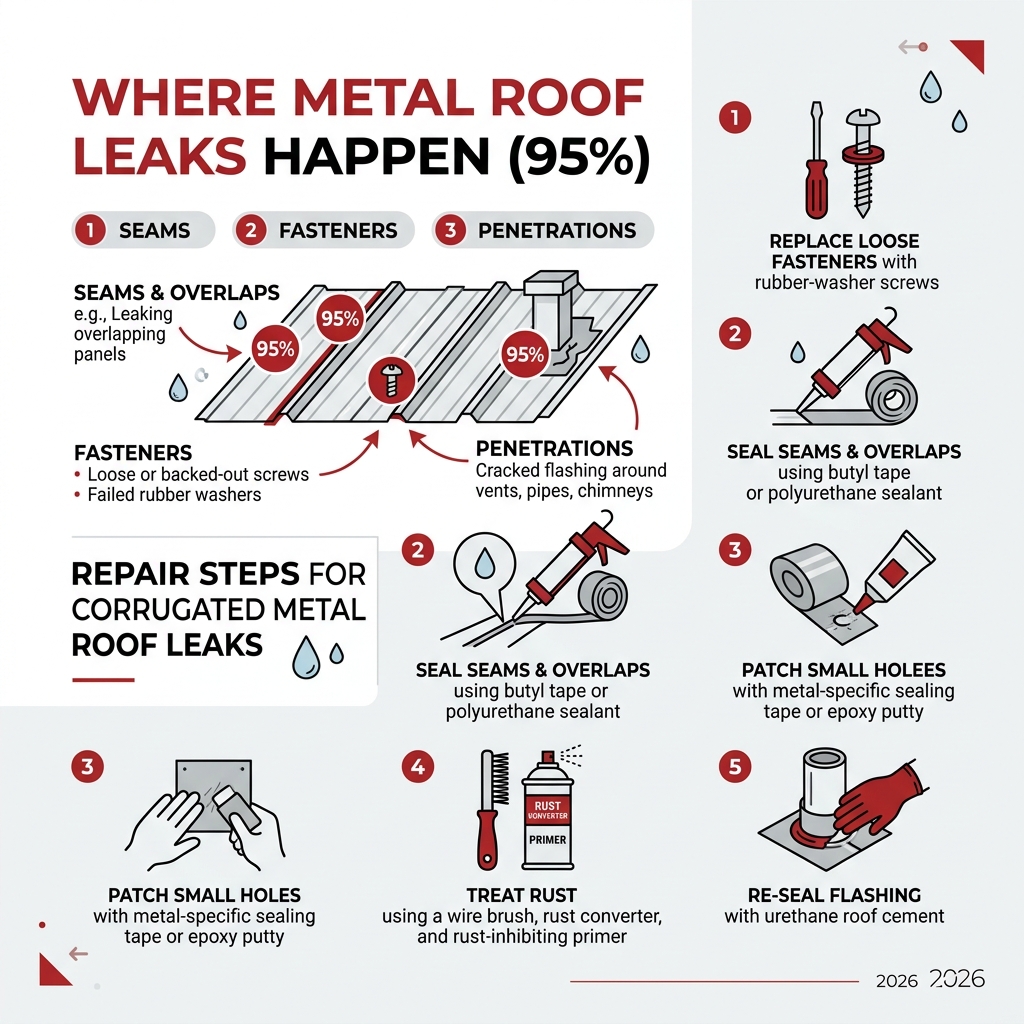
Corrugated metal roofs are exceptionally durable, often lasting 40-70 years while withstanding 140+ mph winds. However, 95% of leaks originate at fasteners, seams, and flashing points rather than the panels themselves. For homeowners in the Texas Hill Country, securing expert roofing services at the first sign of moisture is critical to preventing structural rot. The unique climate of Central Texas, characterized by extreme heat and sudden torrential downpours, puts immense stress on metal roofing components, making regular inspections a necessity rather than a luxury.
According to the Metal Construction Association, thermal expansion and contraction are the primary drivers of fastener fatigue in exposed-fastener systems. A single backed-out screw can allow gallons of water into the building envelope during a typical Texas thunderstorm. Guidance from GAF and Owens Corning also reinforces that routine inspection and maintenance are essential to preserving roof performance and preventing moisture intrusion. These industry leaders emphasize that even the highest quality materials require proper installation and periodic upkeep to reach their full service life.
I’m Daniel Sowell, owner of Total Foundation & Roofing Repair. With over 18 years of experience diagnosing leaks across Central Texas, I’ve seen how a $400 maintenance task can escalate into a $10,000 mold remediation project if ignored. This guide provides the technical steps to identify and repair these vulnerabilities before they compromise your home. For direct help, call (830) 992-6789.
How to Fix Leaks in Corrugated Metal Roof Systems
When you decide to fix leaks corrugated metal roof panels, the first hurdle isn’t the repair itself—it’s finding the water’s entry point. Water is a master of deception; it can enter through a loose screw on one side of the ridge and travel along the underside of a panel for ten feet before dripping onto your ceiling. This is known as capillary action, where water “climbs” or travels through tight spaces against gravity. This phenomenon is particularly common in corrugated systems where the ribs create natural channels for water to migrate.
To accurately perform metal roof leak detection, we recommend starting from the inside. Head into your attic with a high-powered flashlight during a rainstorm. Look for moisture tracing along the purlins or rafters. If it’s dry outside, you can simulate rain with a garden hose, but have a partner inside to shout when the “leak” starts. Start at the bottom of the roof and work your way up slowly to isolate the exact entry point. According to GAF, proper attic ventilation and inspection are key to identifying moisture issues before they cause structural damage.
Once you’ve marked the spot, move to the exterior. Common culprits include degraded sealants around chimney flashing or vent pipes. According to industry experts, a small gap in your seam sealant can turn into an $82 interior damage problem within a single hurricane season if left unaddressed. For a deep dive into the mechanics of these failures, check out this guide on How to Repair a Leaking Corrugated Roof.
Identifying Fastener Failures to Fix Leaks in Corrugated Metal Roofs
Fasteners are the #1 cause of leaks in exposed-fastener corrugated roofs. Metal roofs have a high coefficient of expansion, meaning they grow and shrink significantly as temperatures swing from a chilly 30°F Hill Country morning to a 105°F afternoon. This constant “breathing” creates fastener fatigue, often referred to as thermal shock. The metal expands at a different rate than the wood or steel purlins beneath it, causing the screws to rock back and forth.
Over time, screws back out or “hog out” the hole they are in, creating a gap that water can easily penetrate. Furthermore, the EPDM (synthetic rubber) washers used to seal these screws eventually dry rot and crack under the intense Texas UV sun. If you see a screw head that isn’t sitting flush or a washer that looks like a dried-out grape, it’s time for a replacement. Neglecting these small components can lead to widespread decking rot.
The Fix:
- Remove the old fastener: Use a cordless drill or a nail bar if you’re dealing with old-school roofing nails. Be careful not to scratch the surrounding protective coating.
- Upsize the screw: If the hole has widened, don’t use the same size screw. Move up to a slightly larger diameter “oversized” roofing screw to ensure the threads grab fresh wood or metal. This is a critical step for a long-lasting repair.
- Use the right material: Always use galvanized steel or aluminum screws with fresh EPDM washers. Avoid cheap rubber washers that will fail within a few seasons.
- Don’t over-tighten: Tighten until the rubber washer slightly compresses and expands to the edge of the metal cap. If the washer “mushrooms” out and curls upward, you’ve gone too far, which actually creates a water trap and accelerates the degradation of the rubber.
For more technical details on fastener maintenance, refer to the ultimate metal roof leak repair manual or explore specialized products in this guide on How to Waterproof Corrugated Metal Roofing – Liquid Rubber.
Sealing Seams and Overlaps to Fix Leaks in Corrugated Metal Roof Panels
The horizontal and vertical overlaps where panels meet are prime real estate for leaks. In coastal or high-wind areas, seam deterioration happens 40% faster due to salt air and pressure cycles. Even in inland areas, wind-driven rain can be forced upward under a lap joint—a process called wind-driven rain penetration. This is often exacerbated by hydrostatic pressure during heavy downpours when water pools momentarily in the corrugation valleys.
The “5cm overlap rule” is a standard industry benchmark: your metal patches or panel overlaps should provide at least two inches (5cm) of coverage to prevent moisture from siphoning through. If the overlap is insufficient, even the best sealant will eventually fail under the pressure of a storm.
The Fix:
- Butyl Tape: This is the gold standard for sealing side-laps. It’s a double-sided, sticky tape that stays flexible for decades. You apply it between the two overlapping panels before screwing them together. It provides a gasket-like seal that moves with the roof.
- Polyurethane Sealant: For existing leaks where you can’t easily lift the panels, use a high-solids polyurethane sealant. Avoid standard silicone; it often struggles to adhere to the factory coatings on metal panels over the long term and cannot be painted. Polyurethane offers superior adhesion and flexibility.
- Tighten the Lap: Ensure screws are placed every 10-12 inches along the seam to maintain constant pressure on the sealant. This prevents the panels from “gapping” during high winds.
Properly managing these joints is especially critical when installing metal roof transition flashing or working on a shingle-to-metal transition.
Patching Punctures and Managing Rust Corrosion
Punctures can happen from fallen branches, heavy hail, or even dropped tools. Meanwhile, rust is the silent killer of corrugated steel. Once the protective zinc or Galvalume coating is scratched or worn away, the raw steel oxidizes. If left untreated, this oxidation leads to galvanic corrosion, which can eat through a panel in a matter of months.
Repairing Holes: For small pinholes, a dab of high-quality roof sealant may suffice. For larger punctures (up to 2-3 inches), you need a metal patch.
- Clean the area: Use a wire brush and lacquer thinner to remove all dirt, old “tar,” and loose rust. The surface must be pristine for the sealant to bond.
- Cut a patch: Use a scrap piece of matching corrugated metal. It must overlap the hole by at least 2 inches on all sides to ensure a proper seal.
- Apply sealant: Run a heavy bead of sealant around the underside of the patch edges, creating a continuous waterproof barrier.
- Secure: Use “stitch screws” (metal-to-metal screws) to fasten the patch to the existing roof. Space them closely to ensure the patch sits flat against the corrugations.
Managing Rust: If you see “red rust,” you must act before it eats through the panel. Surface rust is manageable, but structural rust requires panel replacement.
- Wire Brush: Scrape away loose flakes and scale until you reach solid metal.
- Rust Converter: Apply a chemical rust converter that turns iron oxide into a stable, paintable surface. This stops the chemical reaction of rusting.
- Prime and Paint: Use a rust-inhibiting primer followed by a UV-resistant topcoat that matches your metal roofing color. This restores the protective barrier and improves curb appeal.
Essential Tools and Safety Precautions for DIY Repairs
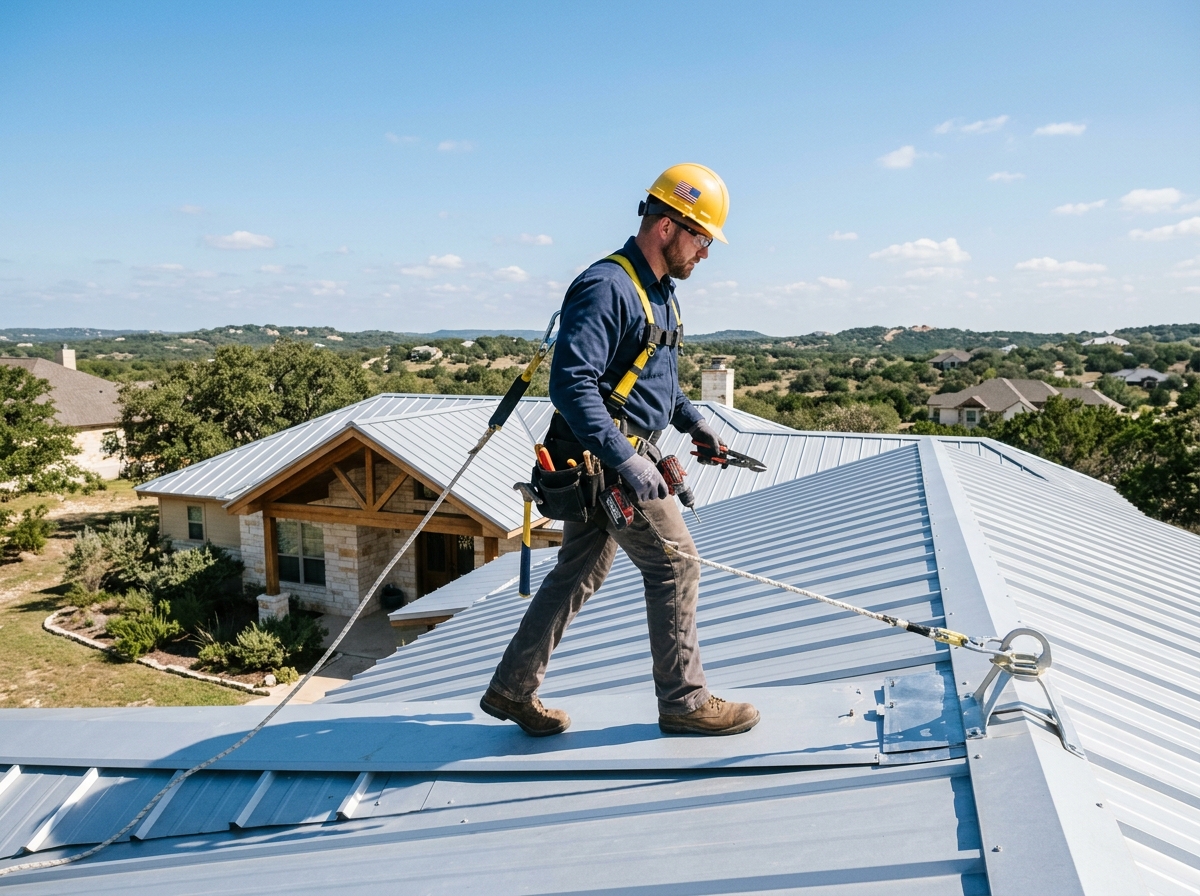
Safety on a metal roof is no joke. Metal is slippery when dry and like an ice rink when wet or dusty. Falls from roofs remain a leading cause of construction-related injuries. Always prioritize your physical safety over the speed of the repair.
Safety Checklist:
- Fall Protection: Always use a safety harness and a roof anchor if the pitch is steep. This is non-negotiable for any work above one story.
- Proper Footwear: Wear soft-soled rubber shoes with excellent grip. Avoid boots with heavy lugs that can trap small stones and scratch the roof coating.
- Ladder Safety: Ensure your extension ladder extends 3 feet above the roof edge and is tied off to prevent sliding.
- Walking Technique: Always walk on the “flats” of the corrugation directly over the purlins (where the screws are). Never walk on the “ribs” or the center of the panel, as this can dent the metal and create “oil canning” or low spots where water will pond and cause future leaks.
Essential Tool Kit:
- Cordless drill with hex head drivers
- Wire brush and putty knife
- Caulk gun and high-quality polyurethane sealant
- Replacement screws with EPDM washers
- Tin snips for cutting patches
If you find yourself in a bind after a storm, don’t hesitate to call for emergency roof repair. Taking risks on a damaged roof isn’t worth it. Additionally, if you’re up there anyway, consider the state of your gutters—installing gutter guards on metal roof systems can prevent debris buildup that causes water to back up under the eaves.
Conclusion: Maintaining Your Metal Roof in the Texas Hill Country
A corrugated metal roof is a long-term investment that adds significant value to your property. In the Texas Hill Country, the combination of intense UV rays, sudden hailstorms, and rapid temperature shifts means your roof works harder than most. By learning how to fix leaks corrugated metal roof systems early, you ensure your home stays dry and your energy bills stay low. A well-maintained metal roof reflects solar heat, whereas a leaking or damaged one can lead to insulation saturation and increased cooling costs.
Regular maintenance is the difference between a 50-year roof and a 15-year headache. We recommend a visual inspection every spring and fall. Look for those backed-out screws, check your gutters, and ensure your sealants aren’t cracking or peeling away from the metal surface.
Sealant Comparison Table
| Sealant Type | Best Use Case | Lifespan | Pros | Cons |
|---|---|---|---|---|
| Polyurethane | Seams and Flashing | 10-15 Years | Excellent adhesion; paintable; highly flexible | Harder to apply in cold temperatures |
| Butyl Tape | Panel Overlaps | 20+ Years | Stays flexible; best for laps; airtight seal | Must be installed during initial assembly |
| Silicone | Small Punctures | 5-10 Years | UV resistant; easy to find; waterproof | Won’t stick to old silicone; not paintable |
When to Hire Professional Metal Roofers
While many small repairs are DIY-friendly, some situations require the expertise of professional metal roofers. You should call a pro if:
- The roof is too steep: If you aren’t comfortable with heights or don’t have professional-grade fall arrest gear.
- There is structural damage: If the roof feels “spongy” or sags, the wood decking or purlins underneath may be rotted and require replacement.
- Warranty issues: DIY repairs can sometimes void manufacturer warranties on newer roofs. Always check your documentation first.
- Extensive Rust: If more than 15-20% of a panel is covered in red rust, replacement is usually more cost-effective than repair.
For residents needing metal roofing in Fredericksburg, TX, or surrounding areas, we provide certified inspections that catch these issues before they become emergencies.
Preventive Maintenance to Stop Recurring Leaks
The best way to fix a leak is to prevent it from happening. Keep your roof clear of leaves and branches, which trap moisture and accelerate rust. Ensure your gutter guards are functioning to prevent eave rot. Neglecting these simple tasks can lead to water backing up under the metal panels, causing hidden damage.
80% of roofs fail prematurely because of neglected maintenance. Don’t let your home become part of that statistic. Whether you need a simple roof repair or a full system evaluation, we are here to help.
Ready to protect your home? Total Foundation & Roofing serves Kerrville, TX, Fredericksburg, Comfort, and the entire Texas Hill Country with high-quality, reliable service. Let’s make sure your roof stays as tough as the Texas landscape!