Why Aggregate Concrete Repair Requires a Different Approach
Aggregate concrete repair is a specialized process for fixing damage on exposed aggregate surfaces, from hairline cracks to loose stones. Unlike smooth concrete, the decorative stones embedded in the surface make repairs challenging. At Total Foundation and Roofing, we understand that success requires matching both the base concrete color and the unique aggregate blend. For over 18 years, our team has provided expert concrete solutions across the Texas Hill Country.
Here’s a quick guide to the repair process:
- Assess Damage: Determine if it’s cosmetic (minor cracks) or structural (deep cracks, settling).
- Choose Materials: Use matching cementitious compounds, epoxy fillers, or polymer-modified mortars.
- Prepare Surface: Clean the area, remove loose debris, and undercut crack edges.
- Apply Repair: Use a bonding agent, fill the damaged area, and hand-seed matching aggregate.
- Cure and Seal: Allow 24-48 hours for curing, then seal for long-term protection.
The main challenge is that standard patching methods often look worse, creating an unsightly patchwork. Weathering changes concrete’s hue, and finding the original aggregate years later can be nearly impossible. For homeowners in the Texas Hill Country, where aggregate concrete is popular for its durability, our region’s soil and temperature swings demand proper repair techniques.
I’m Daniel Sowell, owner of Total Foundation & Roofing Repair in Kerrville, Texas. Our team has completed hundreds of aggregate concrete repairs, and we’re here to share proven methods for lasting results.

Basic aggregate concrete repair vocab:
Understanding Exposed Aggregate Concrete Damage
Exposed aggregate concrete offers a unique, textured finish by showcasing stones like granite or river rock embedded in the surface. While durable, it’s susceptible to damage, and its distinct composition presents specific repair challenges.
Common Causes of Damage
Several factors contribute to the deterioration of exposed aggregate concrete, especially in the Texas Hill Country:
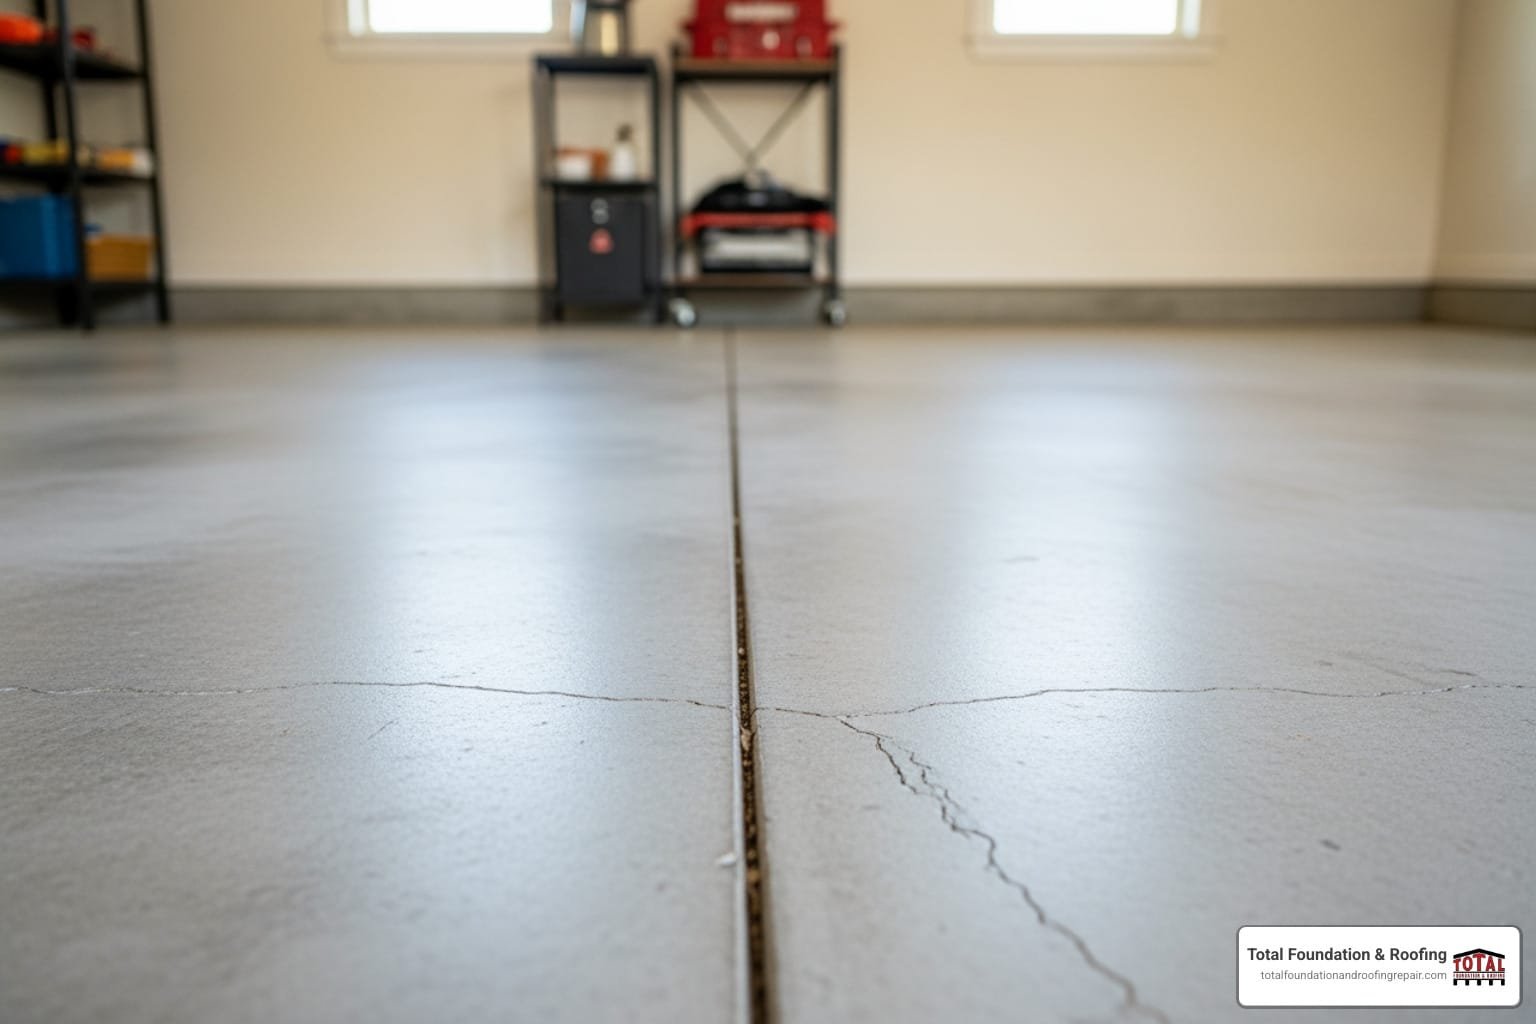
- Freeze-Thaw Cycles: Water seeps into pores, freezes, expands, and causes spalling (flaking) or dislodges stones.
- Heavy Impact: Dropping heavy objects can create divots, chips, and spalls.
- Soil Movement: Expansive clay soils common in our region can swell and shrink, leading to cracks, settling, or heaving. This often requires uneven concrete repair to correct slab shifts.
- Water Damage & Wear: Poor drainage weakens concrete over time, while high-pressure washing or constant traffic can erode the surface and loosen aggregate.
Unique Repair Challenges
Repairing exposed aggregate is more complex than standard concrete. Traditional patching often fails aesthetically for several key reasons:
- Color Matching: Concrete’s color changes with age and weathering, making it extremely difficult for a new patch to match the base mix’s exact tint.
- Texture Blending: Replicating the specific size, density, and placement of the original decorative stones requires careful hand-seeding to avoid a noticeable repair.
- Sourcing Aggregate: Finding stones that match the original size, color, and type can be a major hurdle, especially years after installation.
- Proper Bonding: A strong, lasting bond requires meticulous surface preparation and the correct bonding agents to adhere to the existing textured surface.
At Total Foundation and Roofing, our expertise in local conditions ensures we use specialized techniques for a blended, durable aggregate concrete repair.

A Step-by-Step Guide to Aggregate Concrete Repair
This guide covers the essential steps for effective aggregate concrete repair, restoring both its integrity and appearance.
Step 1: Assessing the Damage & Choosing Your Repair Method
First, determine if the damage is cosmetic or structural to choose the right approach.
- Cosmetic Repairs: Address superficial issues like hairline cracks, minor spalling (chipping), or a few loose stones. Products like Clemons Aggregate Concrete Crack Filler or Roadware MatchCrete™ Clear are suitable for these small-scale fixes.
- Structural Repairs: Involve deeper damage affecting the slab’s stability, such as deep cracks, heaving, or settling. These often indicate underlying soil issues. Our Concrete Heaving Repair Complete Guide offers more insight into these complex problems.
When to Call a Professional: While DIY is possible for minor cosmetic issues, consult a professional for large-scale damage, signs of settling or heaving, or deep, wide cracks. Expert assessment is crucial for ensuring a lasting solution, as outlined in standards like the ACI PRC-546-14 Guide to Concrete Repair. For projects in Kerrville or surrounding areas, our team is ready to help.
Step 2: Selecting the Right Repair Materials
Choosing the right materials is critical for a seamless repair.

Types of Products:
- Cementitious Patching Compounds: Cement-based mixes fortified with polymers for strength. Versatile for various patch sizes.
- Epoxy-Based Fillers: Offer superior bond strength and durability. Clear epoxies like Roadware MatchCrete™ are great for gluing rocks and filling spalls without hiding the aggregate.
- Polymer-Modified Mortars: A blend of cement and polymers, providing excellent adhesion and flexibility.
- Specialized Crack Fillers: Formulated for cosmetic repairs, some contain colored speckles (like Eagle Crack Filler) to mimic the aggregate look.
Selection Criteria:
- Bond Strength & Durability: The material must bond strongly and withstand Texas weather. The ICRI’s Guide for Selecting and Specifying Materials for Repair of Concrete Surfaces is an excellent resource on material properties.
- Color and Texture Matching: This is the hardest part. Try to match the base concrete color. For texture, you will likely need to source matching aggregate stones from a local supplier and hand-seed them into the wet patch.
Step 3: The DIY Aggregate Concrete Repair Process
For minor cosmetic repairs, follow these steps carefully for a seamless finish.
1. Surface Preparation:
Thoroughly clean the area with a stiff brush and concrete cleaner, then rinse and let it dry completely. Use a hammer and chisel to remove any loose, unsound concrete. For better adhesion, undercut the edges of the patch area to create a square profile, which prevents the new material from feathering out and failing. If rebar is exposed, clean off any rust with a wire brush.
2. Mixing and Application:
Follow the manufacturer’s instructions to mix your repair material. For cement-based products, dampen the repair area first (Saturated-Surface Dry condition) to prevent the old concrete from pulling moisture from the new mix. Apply a concrete bonding agent for a stronger hold.
3. Filling and Seeding:
- Fill: Press the repair material firmly into the damaged area with a trowel, eliminating air pockets.
- Level: Slightly overfill the patch, then level it with the surrounding surface.
- Hand-Seed: While the patch is wet, gently press your matching aggregate stones into the surface, mimicking the original pattern and density.
- Blend: Lightly tamp the stones and use a damp sponge or stiff brush to carefully expose the tops of the aggregate, helping it blend with the existing surface.
For more information on repair techniques, see our guide on Concrete Repair Methods.
Step 4: Curing, Sealing, and Long-Term Maintenance
Proper finishing is vital for the repair’s longevity.
- Curing: The repair must cure properly to gain strength and prevent shrinkage cracks. Keep the patch moist for at least 24-48 hours by covering it with plastic sheeting or applying a liquid curing compound. This allows the concrete to hydrate fully.
- Sealing: Once fully cured (check product instructions, typically 3-7 days), apply a high-quality concrete sealer. This protects the repair from moisture and freeze-thaw damage while enhancing the color and luster of the aggregate, helping it blend.
- Long-Term Maintenance: To maintain your aggregate concrete, clean it regularly, avoid harsh chemicals, and plan to reseal the entire surface every 2-3 years. This is the most effective way to prevent future damage.
For larger projects beyond a simple DIY fix, consider hiring a professional Concrete Contractor to ensure a high-quality result.
Safety and Professional Solutions for Your Concrete
While DIY repairs are feasible for minor issues, safety and a professional finish are paramount. Knowing when to call an expert ensures the longevity of your exposed aggregate concrete.
Essential Safety Precautions
Working with concrete repair products involves chemicals and physical work. Always prioritize safety.
- Personal Protective Equipment (PPE): Always wear safety glasses, waterproof gloves, and long sleeves. Use a NIOSH-approved respirator when mixing powders or grinding concrete to avoid inhaling dust.
- Read Product Labels: Before starting, review the Safety Data Sheet (SDS) for each product. Pay attention to warnings like “WARNING: Causes eye irritation” and follow first aid instructions for skin or eye contact.
- Ventilation and Disposal: Work in a well-ventilated area and dispose of unused materials and waste responsibly.
When to Call a Professional for Aggregate Concrete Repair
Small cracks and minor spalls are often manageable DIY projects, but certain situations require professional expertise for a lasting aggregate concrete repair.
Signs You Need a Professional:
- Widespread or Deep Cracking: Extensive cracks wider or deeper than 1/2 inch may signal underlying structural problems.
- Sunken or Settled Slabs: Uneven concrete points to soil settlement, which requires specialized solutions like concrete leveling or other professional lifting techniques.
- Aesthetic Matching: If achieving a seamless color and texture match is critical, a professional has the experience and resources to produce a superior result.
Total Foundation & Roofing Expertise:
At Total Foundation & Roofing, we bring over 18 years of specialized experience to concrete and foundation repair in the Texas Hill Country. Our team understands the local soil and climate conditions affecting properties throughout the region.
We don’t just patch the surface; we diagnose the root cause to provide durable solutions. If you’re facing concrete issues beyond a simple fix, contact us at (830) 224-3737 or request a free estimate for expert Crack Repair services. We’re here to restore the value and beauty of your property.