When Storm Damage Strikes: Your First Line of Defense
An emergency roof tarp is a waterproof covering that temporarily protects your home from water damage after storms, fallen trees, or other roof emergencies. Here’s what you need to know right away:
Quick Emergency Roof Tarp Facts:
– Cost: $175-$700 average, or $0.70-$2.80 per square foot
– Lifespan: 60-90 days for temporary fixes, up to 2 years for heavy-duty installations
– Materials: Polyethylene or vinyl, 6-10 mil thickness recommended
– Timeline: Professional installation within 24-48 hours, DIY takes 1-3 hours
– Insurance: Most policies cover emergency tarping to prevent further damage
When your roof takes a hit from Texas storms, you’re facing two enemies: the damage that already happened and the additional damage that’s coming if you don’t act fast. Water doesn’t wait for convenient business hours or perfect weather conditions.
The research shows that emergency roof tarping costs about 30% more than standard installations, but delaying can lead to structural damage, mold growth, and insurance claim complications that cost thousands more.
The bottom line? A properly installed emergency tarp buys you critical time – usually 60 to 90 days – to arrange permanent repairs without watching your home deteriorate from the inside out.
I’m Daniel Sowell, owner of Total Foundation & Roofing Repair with over 18 years of experience helping Texas Hill Country homeowners through roofing emergencies. I’ve seen how a quick emergency roof tarp installation can mean the difference between a manageable repair and a devastating insurance nightmare.
Emergency Roof Tarp Basics: What, When & Why
An emergency roof tarp is essentially your home’s first aid kit. When storms roll through Kerrville, Fredericksburg, and Comfort, you need that temporary barrier standing between your family and the elements. We’ve responded to everything from hail damage to massive oak trees that decided your roof looked like a comfortable place to rest.
Storm damage is the obvious culprit, but we’ve also tarped roofs after vandalism, fire damage, and wildfire ember situations. Your insurance company isn’t just suggesting you get emergency tarping done – they’re often requiring it. It’s called damage mitigation, and skipping this step can seriously hurt your claim.
Water damage doesn’t just stop at your shingles. It seeps into your roof deck, travels down your walls, and creates the perfect environment for mold growth. We’ve seen beautiful homes turn into health hazards because homeowners thought they could wait a few extra days for permanent repairs.
What Is an Emergency Roof Tarp?
Think of an emergency roof tarp as a heavy-duty raincoat for your house. It’s a waterproof barrier made from either polyethylene or vinyl that covers the damaged area until we can get your roof properly fixed.
The material quality makes all the difference. We use tarps that are 6 to 10 mil thick. Anything thinner will shred in our winds, and anything thicker becomes a wrestling match to install.
UV protection is absolutely crucial here in Texas. Quality tarps with proper UV protection typically last 60 to 90 days for basic applications, while heavy-duty professional installations can protect your home for up to 1 to 2 years if needed.
We typically recommend polyethylene over vinyl because it handles our temperature swings better. When it’s 105°F in July and then drops to 25°F in January, you want a material that won’t crack under pressure.
When Is an Emergency Roof Tarp Non-Negotiable?
Active leaks during a rainstorm top that list. If you’re putting buckets in your living room, every minute counts toward preventing thousands in interior damage.
Hail damage is particularly sneaky in our area. Even if you don’t see water dripping immediately, hail creates tiny fractures in shingles that will fail during the next storm.
High winds that lift or tear off shingles expose your roof deck to direct weather. Wildfire embers can create similar urgent situations, especially during our dry seasons.
When you can see your roof deck from the ground, or when structural elements are exposed after fallen trees or flying debris, you’re looking at potential damage that goes far beyond simple shingle replacement. These situations require immediate Emergency Roof Repair attention.
The bottom line? If water can get in, it will get in. And once it’s inside your home, it starts causing damage that compounds every hour you wait.
Safety First: Gear, Weather & Prep
Roof work can seriously hurt you. Emergency conditions make it even more dangerous. The golden rule is simple: never attempt roof work during active storms, high winds, or on wet surfaces. If your roof is actively leaking and conditions are unsafe, grab some buckets to catch the water inside and wait for the weather to improve.
Ladder safety isn’t optional. Your ladder should extend at least three rungs above the roofline. Position the base one foot away from the wall for every four feet of ladder height. Secure both the top and bottom, but never trust gutters to support your full weight.
Personal protective equipment saves lives. You need heavy work gloves, safety glasses, long sleeves and pants, and boots with good traction. If you’re working on a steep roof, a safety harness isn’t just recommended – it’s essential.
Never work alone. Your helper stays on the ground to steady the ladder, hand up materials, and call for help if something goes wrong.
Before you even touch the ladder, walk around your property and clear away storm debris. Then check your attic from inside with a flashlight to pinpoint exactly where water is entering.
For complex damage or challenging conditions, our Storm Damage Repair team has the experience and equipment to handle installations safely.
DIY vs. Pro: Deciding Who Goes on the Roof
DIY makes sense when you have construction experience, the damage is small and easy to reach, your roof has a gentle slope, weather conditions are calm, and you have proper safety equipment plus a reliable helper.
Call professionals when your roof is steep, high, or hard to access, the damage involves structural elements, you’re uncomfortable with heights, weather conditions are challenging, or you need immediate response.
Professional emergency crews are available 24/7 and typically respond within 24 to 48 hours. They carry liability insurance, have commercial-grade equipment, and can handle complex installations.
Yes, professional installation costs more – typically $400 to $600 versus $150 to $350 for DIY materials. But that price difference often pays for itself in safety, speed, and peace of mind. You can Find Local Pros who specialize in emergency responses.
Tools & Materials Checklist
Start with the tarp itself. Choose heavy-duty polyethylene with UV protection, 6 to 10 mil thickness minimum. Size it at least 3 feet larger than the damaged area on all sides.
For securing the tarp, you’ll need 2×4 lumber cut into 4-foot sections, galvanized cap nails or 2-inch deck screws with washers, and sandbags for temporary weighting.
Essential tools include a cordless drill with bits, hammer, measuring tape, chalk line, and a sharp utility knife with extra blades.
Safety equipment means an extension ladder rated for your weight plus materials, safety harness for steep roofs, heavy work gloves, safety glasses, and boots with good grip.
Don’t cheap out on tarp quality. A $50 heavy-duty tarp that protects your home for three months is infinitely better than a $20 light-duty tarp that shreds in the first windstorm.
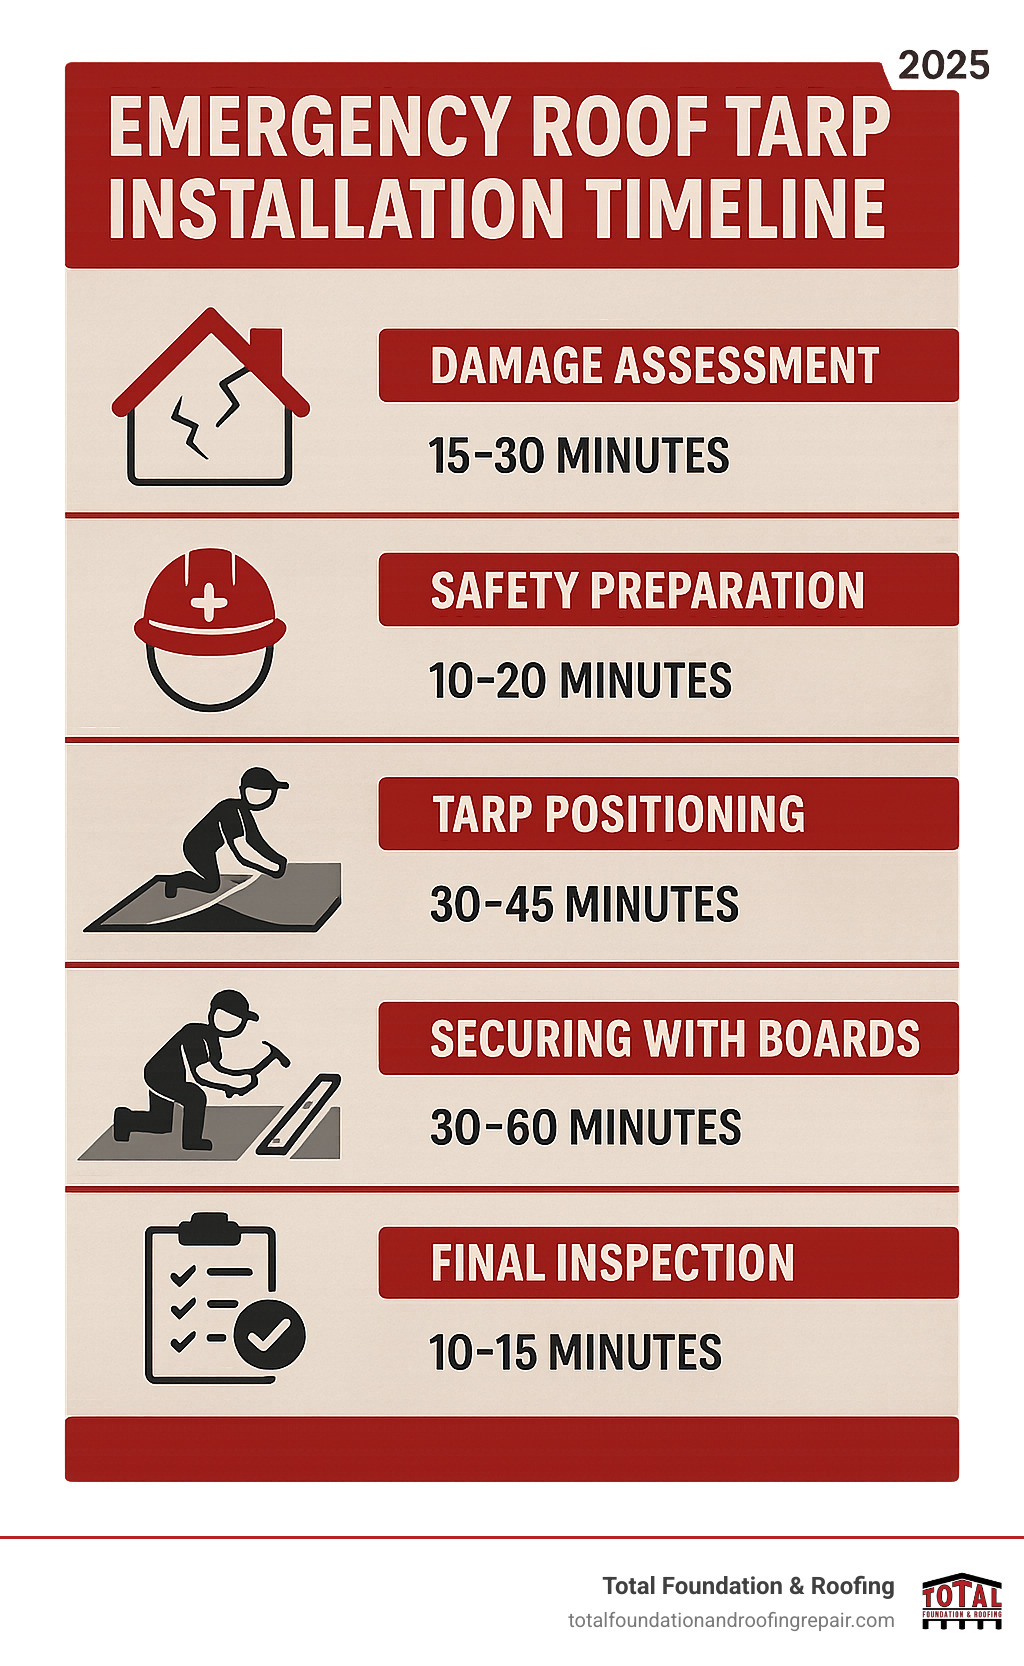
Step-by-Step Guide: Installing an Emergency Roof Tarp
Installing an emergency roof tarp isn’t rocket science, but it does require patience and attention to detail. You’re creating a temporary weatherproof barrier that needs to withstand Texas winds, rain, and whatever else Mother Nature decides to throw at it.
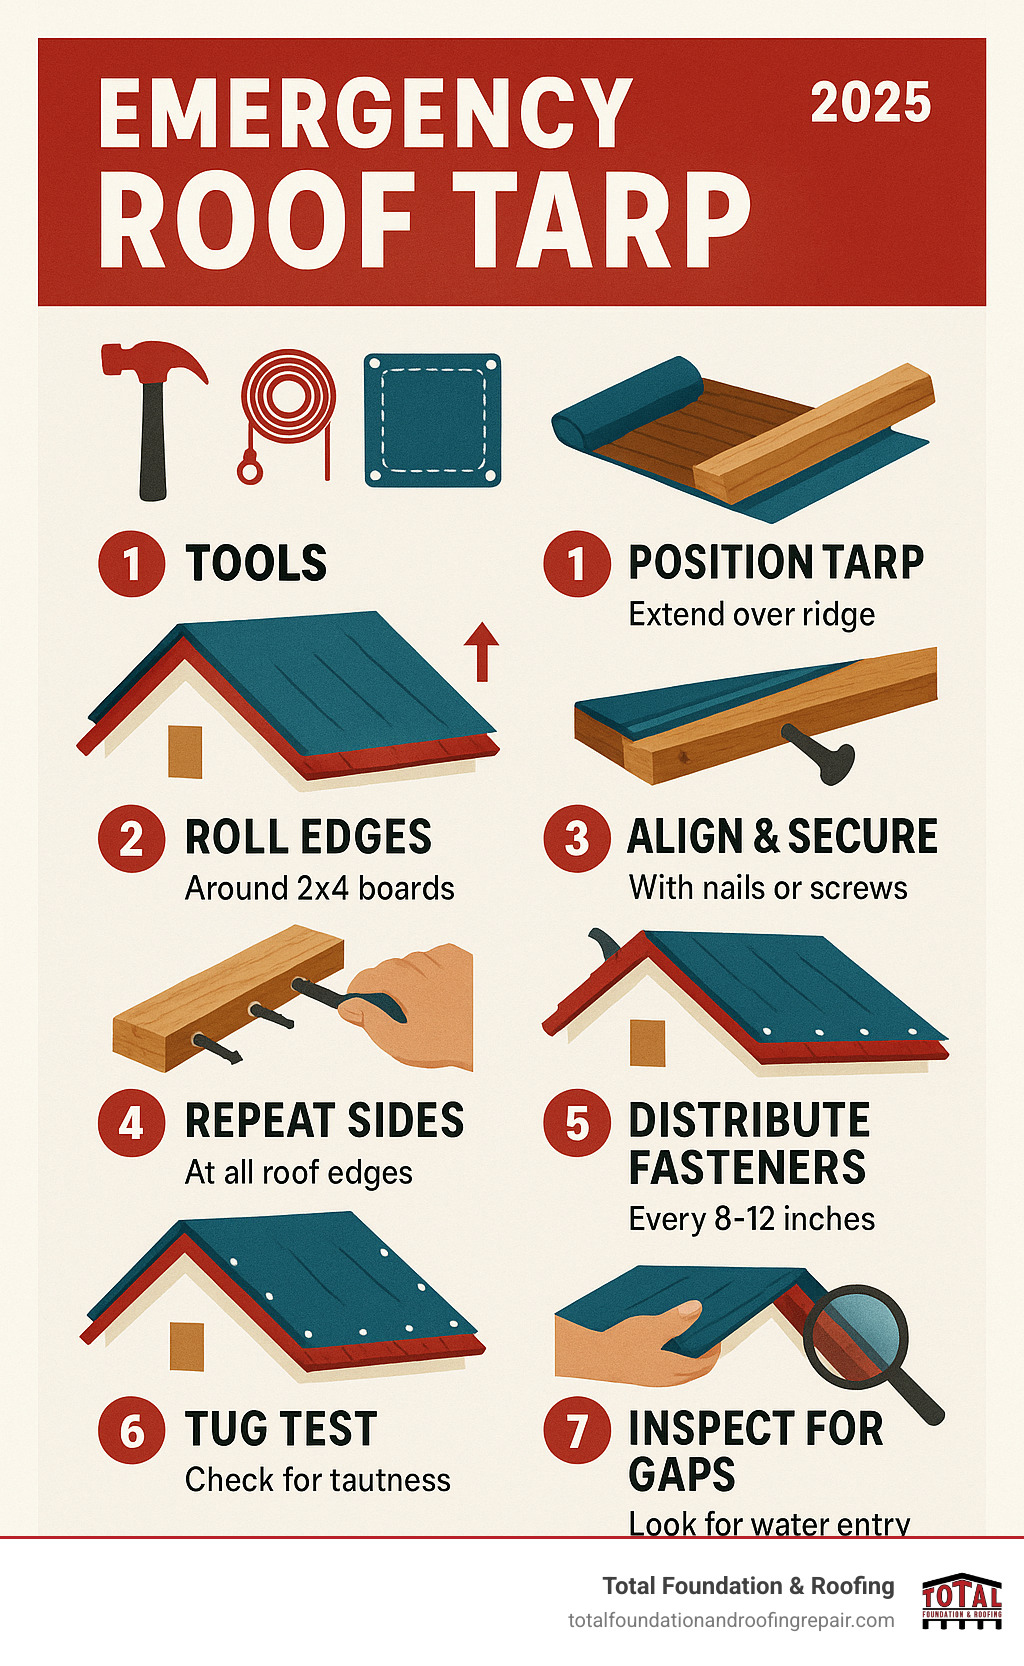
The installation follows seven essential steps. First, assess and measure the damage from the ground using binoculars. Add at least 3 feet on all sides to your measurements – this overlap isn’t optional.
Next, prepare your materials on the ground. Lay out your tarp and inspect it for defects. Cut your 2×4 lumber into manageable 4-foot sections.
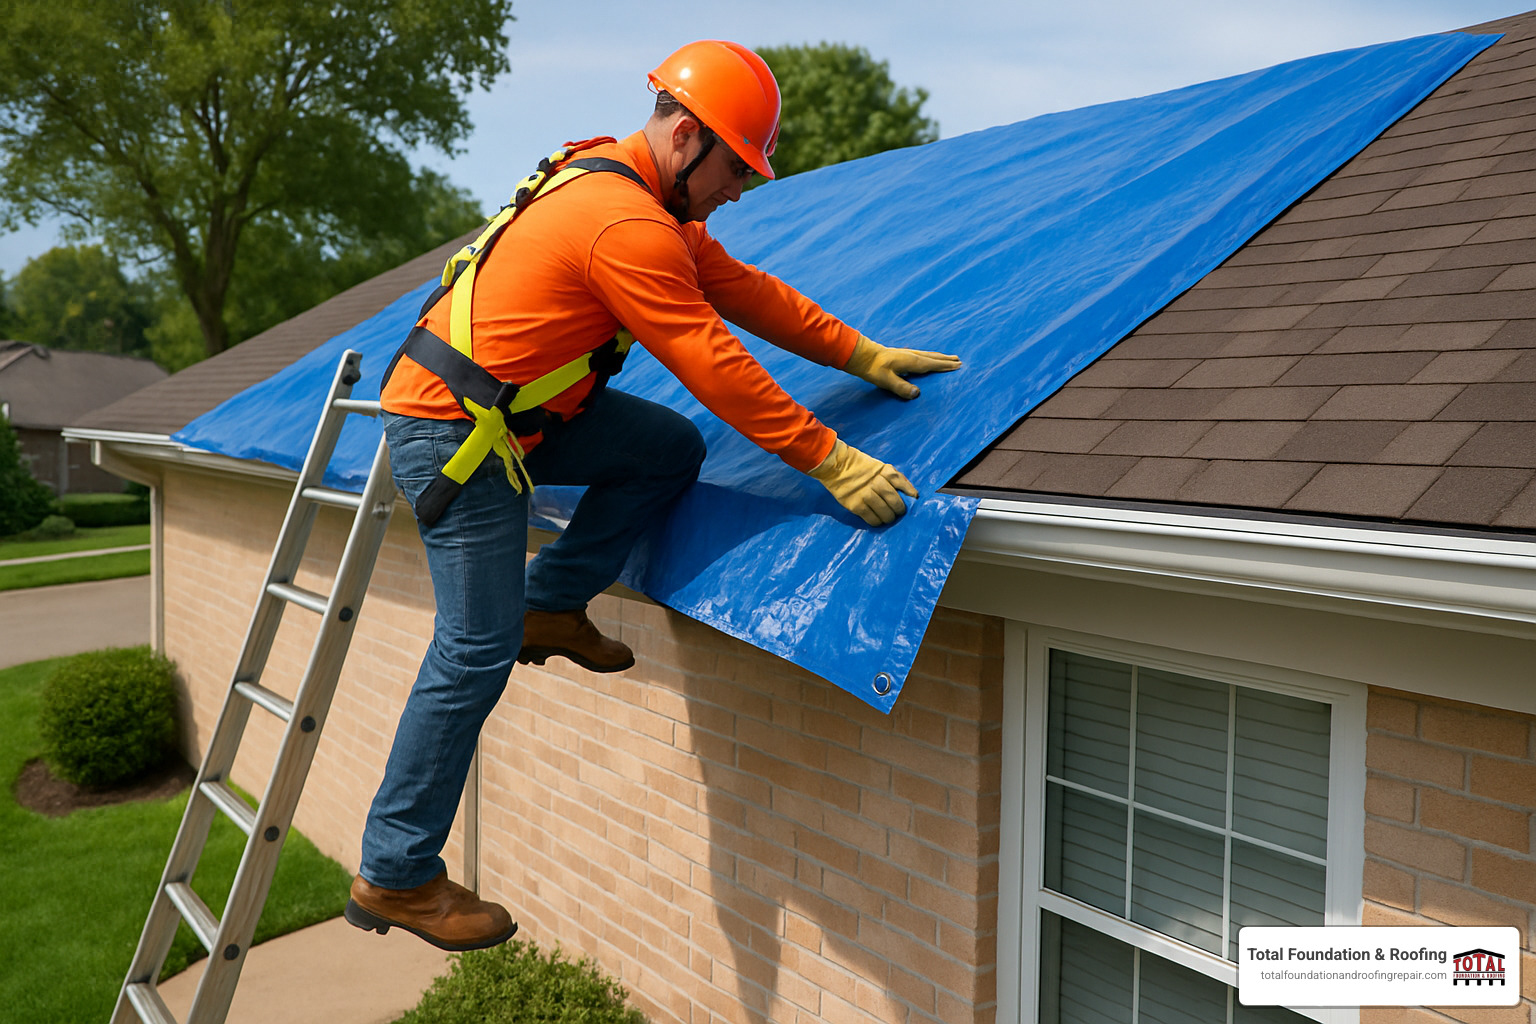
Positioning the tarp requires careful coordination with your helper. The tarp must extend over the roof ridge and hang down at least 12 inches on the opposite side – this creates the water-shedding action that protects your home.
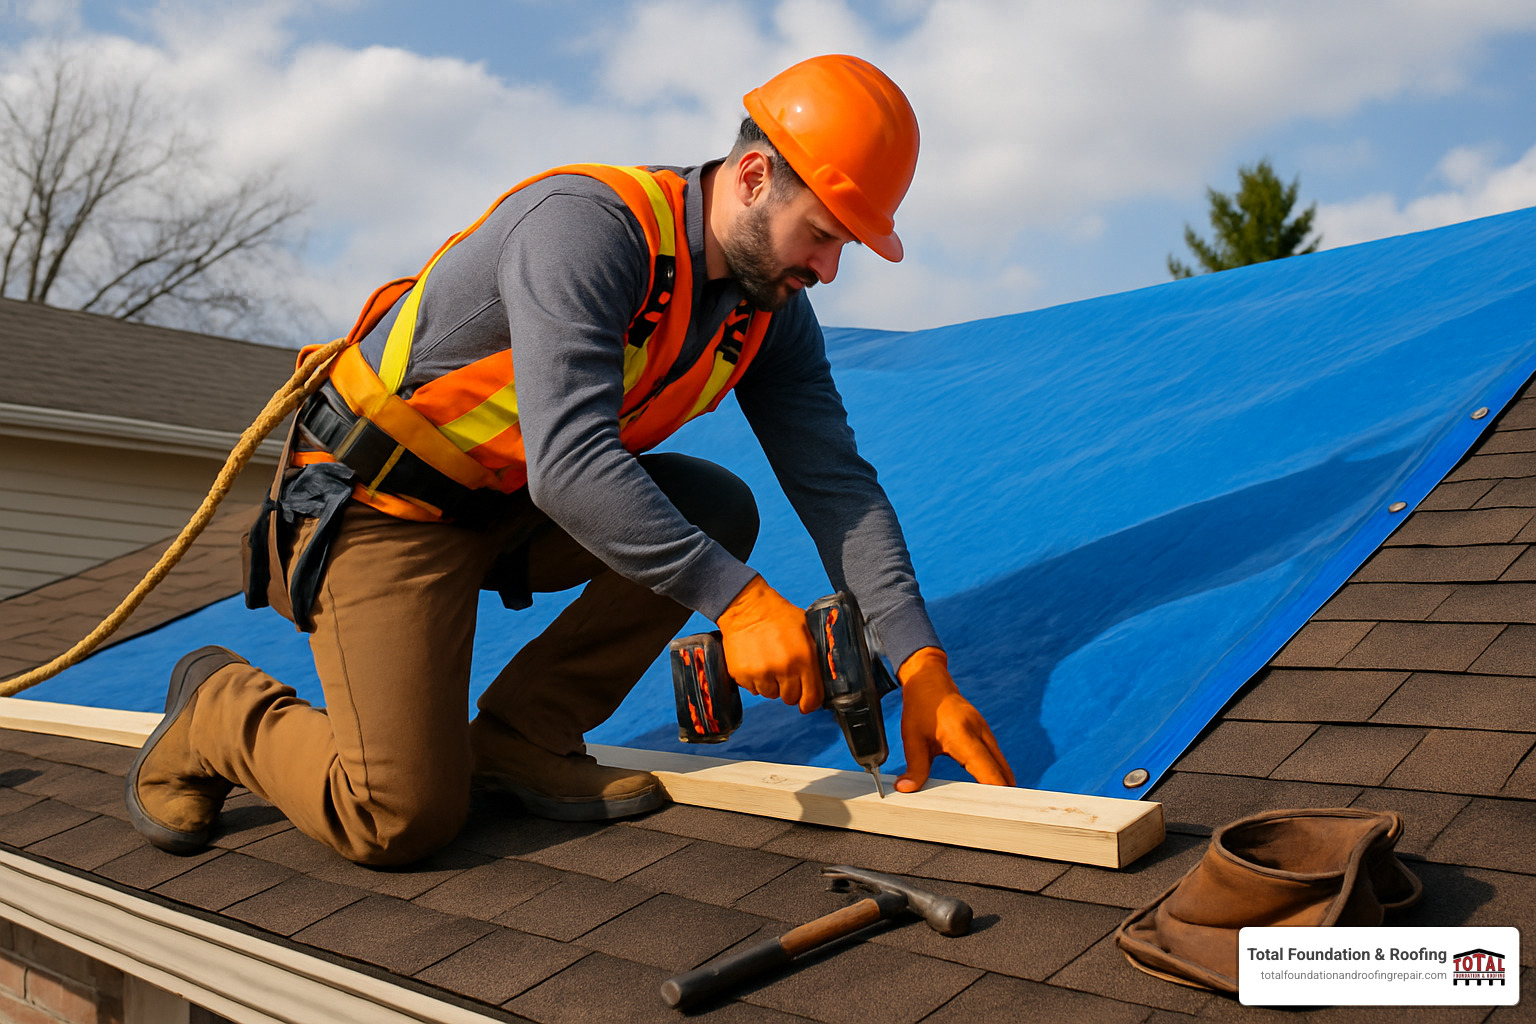
Securing the edges properly is where most DIY installations fail. Don’t just nail through the tarp material – it’ll tear out in the first windstorm. Instead, roll the tarp edge around a 2×4 board, creating a “board sandwich.” This distributes stress across a much larger area.
Fasten those boards with galvanized nails or screws every 8 to 12 inches. Drive them through the board and tarp into solid roof decking.
Walk around your installation and check for gaps or areas where wind could sneak under the tarp. Adjust tension as needed, but don’t over-tighten.
Finally, document everything with photos before and after installation. Your insurance company will want to see that you took reasonable steps to prevent further damage.
Locating the Leak Before You Climb
The water stain on your ceiling probably isn’t directly under the actual leak. Water travels along roof decking, follows rafters, and can show up several feet away from where it actually entered.
Start inside the house. Look for water stains on ceilings, wet insulation in the attic, and water tracks along structural members. Follow the water path backward to its source.
From outside, scan for missing shingles, cracked flashing around chimneys or vents, or damaged gutters. Pay special attention to roof valleys where two roof planes meet.
If you can safely access your attic during rain, look for active dripping or wet spots on the underside of roof decking. Mark these locations with chalk.
Our Roof Leak Detection services use specialized equipment for tricky leaks, but for emergency situations, your eyes and a good flashlight will usually get the job done.
Positioning & Anchoring the Tarp
The ridge-overhang technique works for most situations. Your tarp needs to cover the damaged area plus that crucial 3-foot buffer zone, then extend over the roof peak and down the opposite side by at least 12 inches.
Why the overhang? Because water doesn’t just fall straight down. Wind-driven rain comes at angles, and without proper overhang, moisture can work its way under the tarp edges.
Edge rolling is absolutely crucial. Roll that tarp edge around your 2×4 board before fastening. This simple step is the difference between a tarp that lasts three months and one that fails in the first storm.
Wind-load distribution means fasteners every 8 to 12 inches along secured edges. Texas winds don’t mess around.
Inspecting Your Emergency Roof Tarp for Gaps
The tug test reveals problems before they become disasters. Gently pull on different sections of the tarp to identify loose areas. The tarp should be taut but not drum-tight.
Check that edge tension is consistent along all secured edges. Look for areas where the tarp is pulling away from fasteners.
Rain simulation with a garden hose helps identify potential problems before the next storm hits. Spray water on the tarp surface and watch how it sheds.
Photo documentation serves double duty. Insurance companies want proof that you took reasonable steps to prevent further damage. Take pictures from multiple angles, including close-ups of secured edges and wide shots of the overall installation.
Costs, Insurance & Lifespan Realities
DIY emergency roof tarp installation typically runs between $150 to $350 for materials. Professional installation changes the math considerably, running $400 to $600 for standard service, or $0.70 to $2.00 per square foot. Emergency after-hours service costs $1.00 to $2.80 per square foot.
That 30% emergency premium might seem steep until you’re standing in your living room at midnight watching water drip through your ceiling. Most emergency roof tarp jobs cover 200 to 500 square feet, meaning you’re typically looking at $140 to $1,400 in total costs.
| Installation Type | Cost Range | Per Sq Ft | Typical Timeline |
|---|---|---|---|
| DIY Materials | $150-$350 | $0.30-$0.70 | 1-3 hours |
| Professional Standard | $400-$600 | $0.70-$2.00 | 24-48 hours |
| Emergency After-Hours | $500-$800 | $1.00-$2.80 | Same day |
Material quality makes a huge difference in longevity. A basic 6-mil tarp might protect your home for 60 to 90 days under normal Texas weather conditions. Upgrade to a heavy-duty 10-mil tarp with UV protection, and you’re looking at 1 to 2 years of reliable protection if installed correctly.
Will Homeowners Insurance Pay for Your Emergency Roof Tarp?
Most homeowners insurance policies will cover emergency tarping costs. Insurance companies actually want you to install emergency tarps. They’d much rather pay a few hundred dollars for tarping than thousands for interior water damage that could have been prevented.
Photo documentation is your best friend when dealing with insurance claims. Take pictures of the original damage before you do anything. Document the tarp installation process. Keep every receipt.
When the insurance adjuster visits, make sure they understand that the tarping was necessary emergency mitigation. Most adjusters appreciate proactive homeowners who prevent additional damage.
Policy caps for emergency measures typically range from $1,000 to $5,000, which covers most residential tarping situations comfortably. Some insurance companies in storm-prone areas have streamlined processes specifically for emergency tarping.
Install your emergency roof tarp as soon as safely possible after damage occurs, and notify your insurance company promptly. Delays can complicate claims and might be seen as negligence.
Factors That Drive Price Up or Down
Roof accessibility is probably the biggest cost driver after materials. A simple single-story ranch house costs significantly less than a two-story home with landscaping obstacles or complex rooflines.
Material choices impact both upfront costs and longevity. That $30 light-duty tarp might seem appealing, but it’ll likely fail in the first windstorm. The $80 heavy-duty tarp with UV protection provides reliable protection for months instead of weeks.
After-hours timing automatically adds 30% to 50% to professional installation costs. Emergency calls during nights, weekends, and holidays command premium pricing.
Regional demand affects pricing significantly, especially after major storms hit the Texas Hill Country. When every roof in Kerrville needs attention after a hailstorm, basic supply and demand economics drive prices up.
The bottom line? Quality materials and proper installation cost more upfront but provide better protection and longer service life.
Frequently Asked Questions about Emergency Roof Tarps
How Long Can an Emergency Roof Tarp Safely Stay Up?
60 to 90 days for most installations, but I’ve seen quality tarps protect homes for much longer when properly installed. The key word here is “properly.”
UV degradation is your biggest enemy. Texas sun doesn’t mess around, and even the best UV-protected tarps will eventually become brittle and develop holes. That’s why I always tell homeowners to start planning permanent repairs immediately after tarp installation.
Weather stress tells the real story about tarp lifespan. A tarp that might cruise along for three months in mild spring weather could fail in just weeks during our intense summer heat or severe storm season.
The quality of the original installation makes a huge difference too. I’ve seen professionally installed emergency roof tarps last over a year, while poorly secured DIY jobs fail in the first windstorm.
My recommendation? Plan for permanent repairs within 90 days maximum. If you need longer protection, invest in professional-grade materials and installation.
What Are the Risks of Delaying Installation?
Water damage starts immediately – not next week, not when it’s convenient, but right now. I’ve walked into homes where a small roof leak turned into thousands of dollars in ceiling, wall, and flooring damage because the homeowner thought they could wait.
Mold growth is the silent killer that really gets expensive. In our Texas humidity, mold can start growing within 24 to 48 hours of water intrusion. Once mold gets established in your walls or attic, you’re looking at remediation costs that often exceed the original roofing repair by thousands.
Your insurance company expects you to act reasonably to prevent further damage. Insurance complications arise when delays suggest you didn’t take proper steps to protect your property.
Each storm that hits your unprotected roof causes more damage. What starts as a few missing shingles becomes rotted decking, then structural damage, then a major reconstruction project.
Can I Re-Use a Tarp After Permanent Repairs?
Absolutely, if you remove it carefully and it’s still in good condition. I always tell homeowners to think of quality tarps as investments that can serve multiple purposes.
Condition assessment is everything. Look for holes, tears, and signs of UV damage before storing the tarp. Small holes can be patched with tarp repair tape, but if the material feels brittle or has extensive damage, it’s time to retire it.
Proper storage makes the difference between a reusable tarp and expensive trash. Keep it clean, dry, and folded properly in a cool, dark place.
Quality emergency roof tarps that have been through one installation can still serve effectively as backup emergency supplies, ground covers for landscaping projects, or temporary weather protection for outdoor equipment.
I recommend keeping used tarps as secondary emergency supplies rather than primary protection. When you’re facing another roof emergency, you want materials you can absolutely count on.
Conclusion
When storm damage strikes your Texas Hill Country home, you now have the knowledge to respond effectively. Installing an emergency roof tarp transforms from a daunting emergency into a manageable task when you understand the process, respect safety requirements, and use quality materials.
Quick action saves thousands. We’ve seen it countless times: homeowners who act within 24 hours of damage typically face repair bills that are half the cost of those who delay. Water doesn’t negotiate or wait for convenient timing, but a properly installed tarp gives you control over the situation.
Whether you invested $200 in DIY materials or $600 for professional installation, you’ve made a smart financial decision. Compare that to the $5,000 to $15,000 in additional structural damage, mold remediation, and interior repairs that can accumulate when roofs remain exposed to Texas weather.
The 60 to 90-day protection window your tarp provides isn’t just about keeping water out – it’s about giving you time to make informed decisions about permanent repairs. You can research contractors, compare estimates, and coordinate with insurance adjusters without watching your home deteriorate daily.
Safety always comes first. If you found yourself uncomfortable with any part of the installation process, that’s valuable self-knowledge. Professional emergency services exist precisely because not every homeowner should climb onto a damaged roof with a tarp and power tools.
At Total Foundation & Roofing, we’ve guided hundreds of Texas Hill Country families through situations just like yours. The combination of immediate protection and expert permanent repairs gets your home back to full strength faster and more cost-effectively.
Your emergency roof tarp has bought you precious time, but don’t let that time slip away. Use these next few months to arrange permanent repairs with qualified professionals who understand our unique Hill Country weather challenges.
Ready to move from temporary protection to permanent solution? Request a Free Estimate and let’s get your roof back to full strength before the next storm season arrives.